Showing posts with label vintage. Show all posts

Wednesday, May 11, 2011

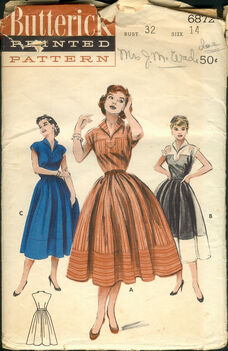
Next Vintage Project - Butterick 6872

Last year I scored a copy of this lovely vintage pattern on Ebay in a size 16:


It is Butterick 6872; ca. early to mid 1950s; One Piece Dress: Shoulder Spanning Yoke. Gay and casual - interesting details: shoulder-spanning yoke that ends in a simulated tab, deep hem band. Collar and yoke cut-in-one. (A) Yoke and hem band cut crosswise for stripes. (B) Contrast yoke and band. (C) One fabric.

I just adore the striped version. It is a more interesting version of this dress from Land's End:
 
I will be making it as part of the Pattern Review Vintage Pattern Contest.  I have until June 30th to complete it. I think it will be easier than last year's vintage pajama project as I will not have to deal with modifying a pants pattern. The pattern tissue is also printed, which is much easier than those confusing dots. I will have to grade the bodice up to my proper size. I've got the bodice pieces all traced out.

I will be using this linen blend fabric from Gorgeous Fabrics


It will be beautiful, no? I may have to invest in a crinoline to wear with it. We'll see.

Thursday, July 15, 2010

Advance 5985 - Construction Details

When I found time to work on this project, it went together very easily.   Several times in the construction the instructions say to cut out a facing piece or bias strips of a certain length. In modern patterns, these pieces would be included so you wouldn't have to be scrounging around through the scraps for a large enough piece. This is why reading through the instructions before you cut and sew is important!

So the side zip was something I hadn't done before, that I can remember. You first make the facing piece by making a narrow hem on a piece of fabric (I'm too lazy to look up the actual dimensions). This facing is then stitched to the trousers right sides together in a narrow V. The V is then slit and the facing is turned to the inside. The finished edges are stitched close to the teeth of the "slide fastener." The rest of the facing is tacked into place. It is not a pretty finish, but I don't think anyone will ever see this but me.
 
The waist area of the trousers ended up being too large. I was over-generous with my additions and cut off part of  the center back that and added a second pleat to the back to take up the excess. With the waistband, however, I had the opposite problem. It was too small. I cut it to fit my exact waist measurement and did not allow for any wearing ease. Ugh! I cut it out again adding 2 more inches. The instructions say to make the waistband (folding in half, right sides together, trim and turn) and then attach it to the trousers. I, instead, used a more modern method (pressing unnotched edge 1/2", stitching notched edges to trousers, then folding in half length-wise, stitching ends together, turning and stitching in the ditch to catch the folded edge in the stitching). I'm not sure if my method was any easier than the original. Probably not, but it is the method I am more used to. Though I'm not used to such high waisted pants, The waist fits comfortably. There is a bit of a gape in the back. I used a vintage button from my stash to finish them off.

For the bodice, I followed the instructions as best as I could. I did overcast the exposed shoulder, center front and back and side seams to prevent raveling. My side vent "facings" did not line up nearly as well as they should have, but with some handstitching they are acceptable. The whole time, however, I was thinking that their had to be a better way. I also tacked the sleeve facings in place to keep them folded over. The instructions do not say what size of button to use. I bought some half inch shank style buttons. They are a bit small. I can always replace them with 5/8" or 3/4" if I find that they do not stay fastened well.

Next up, the big reveal and final thoughts....

Thursday, July 8, 2010

Advance 5985 - Alteration Frustration

The vintage pajamas that I have been working on for months (or more appropriately, NOT working on) are finished! Besides not scheduling time to actually work on the sewing, what took so long? Two words: alteration frustration.

The reason I do not consider myself an advanced sewist is in part because of my limited fitting abilities. Granted, I am getting much better about using the appropriate pattern size to begin with and altering to my specific measurements, but I don't often know right off the bat what or how to do them. I have two reference books that I use in addition to online tutorials and the wealth of knowledge at Pattern Review: Singer's The Perfect Fit and Reader's Digest Complete Guide to Sewing. 

I am generally a visual person, so I have to see things in my head and visualize the flat pieces bending and morphing into their 3D shapes in order to understand. 1950's patterns to do not have the best directions.

I did a flat measurement of the pattern pieces to get an idea of the finished garment measurements. Modern patterns usually include these, but not always vintage. The trousers, as I thought, were significantly smaller than my measurements. I needed to add 4 inches to the waist, 5 1/2 inches to the hip, 2 inches to the thigh and shorten them by 3 inches. These additions were complicated by the fact that the trousers pattern was once piece (no side seams!) and had the weirdest crotch profile I have ever seen.

The pattern looks almost like it is upside-down, but it is not. (Maybe they would have fit better that way?) As designed, the crotch would hang down to my knees! Did they design them this way for modesty or did they just not know how to design trousers for women?

Given the one piece pattern, I could not simply add extra to the hip side seams as my fitting books were showing me.  So after studying the instructions and pictures, munching on some peanuts making sketches with my fitting book perched atop my head (osmosis?) I finally figured it out. To preserve the crotch length (even though it was weird, it was long enough), I split the pattern down the middle and added 2 inches (for a total of 4" at waist) and added an additional 3/8" width at the crotch seam for the 1 1/2 inches needed at the hips. I added 1" at the inner thigh and left the length for the time being.
The tissue fit of these changes was fine in the hip area, but, as I suspected, the crotch was 3-4 inches too low. After bringing up the depth, I followed the Reader's Digest guide for adding length by utilizing both the crotch point and crotch seam methods. Now my funky crotch line looks more like this.


 To alter the waistband (aka "belt") I added 1 1/8" to the side seam between the front and back notch and 1 3/4 inches between the back notches for 2 7/8 inches total. This proved to be wrong on my part, but more about that later.

I knew that the bodice would not be too difficult to alter. The flat measurement revealed that the top had a generous amount of ease (9 inches at the bust line and about 7 inches in the hip area). As I said in my previous post, a 34 bust is just about right for me. After all of that drama with the trousers, I was delighted to find that I did not need to make a single alteration to the bodice. Not. One. Even the neck and arms fit beautifully with plenty of ease built in!

I felt confident enough with the fit of both pieces to cut out my fashion fabric. I had originally wanted to use a coppery brown to match the background of the Amy Butler fabric, but once it arrived it did not match nearly as well as I thought it did online. (That's one of the dangers of online fabric shopping). At my local fabric store I came across this lightweight cotton in a lovely chartreuse. It is not a color that I would have ever chose, but I really like it! It has a very vintage look to it. I also used the chartreuse for the accent pieces of the top. Some lovely yellow buttons, a lovely yellow thread and zipper and I was on my way!

Next up the construction...
My previous post on this pattern: Walk Through a Vintage Pattern .

Sunday, April 18, 2010

A walk through a vintage pattern


My next sewing project is working with a vintage pattern. Part of the fun of working with a vintage pattern is learning about the pattern's past. Who owned it and what was she like? Did she make the pattern? Why not? What was life like at that time? Many people collect vintage patterns for the cover art or because of the designer. Come along with me as I peruse this pattern for the first time.

Merriam-Webster defines "vintage" as: "of old, recognized, and enduring interest, importance, or quality : classic;  dating from the past : old." Classic and enduring. That is the appeal of vintage, no? Styles and trends come and go.  Vintage (classic) styles will be around forever. Classic styles for me are fitted jackets, pants and dresses;  tops and jackets with peplums, pleats or tucks, and anything Asian inspired. I also adore anything Art Nouveau (1890's-late 1920's) and the clean lines of Modern (late 1950's, early 1960's). So this Asian-inspired pajama set is definitely vintage in my definition of style.

This is my first time working with a pattern from this era.  I remember my mother making a vintage dress for my sister's prom. (That's it on the right.) It was a strapless gown with boning and a petticoat. I remember the delicate pattern pieces, pre-cut and folded into the paper envelope. We found that pattern up the creaky back stairs of a thrift store run by Mennonites in my home town. Oh, that attic was full of the most delightful things, including a huge stash of vintage patterns! And cheap, too. I remember getting a vintage wool coat there in high school for like $2.00. They also had hats, suits, shoes.  The thrift store changed hands a few years after I left for college. It is an "antique mall" now where the great finds have already been found and priced exorbitantly high.

My first task was to find a date for this pattern. Careful examination of the envelope and instruction sheet did not reveal any copyright date. A quick Google search later and I found out that Advance patterns of this time period were not dated. From the style and sizing, however, I can determine that it is early 1950's. More information about Advance patterns can be found at Cemetarian.

Another clue to the age of the pattern is from the bottom of the envelope where it says that the pattern was featured in Woman's Home Companion. This magazine, I found out with another Google search, was a very popular magazine that folded in 1957.  Here are some terrific images from the magazine's early years.


I'm curious to see the pattern in the magazine. Was it just an ad? Was it featured in a story? The archives are not available online anywhere that I can quickly find. I'll had to do more research on this. Perhaps our local university library has the back issues on microfilm.

A quick look at the back of the envelope also shows that  the pattern pieces are "pre-cut". Seam allowances are 1/2" instead of the 5/8" that is standard today. The dress sizes are much smaller than in patterns of today. This pattern is a size 16 with a bust measurement of 34 inches. I will have to significantly alter the pattern to fit me. I generally use a modern size 14 for tops and a 16 or 18 for bottoms.

The garments are not listed separately, but are grouped together for fabric yardages. So you can buy fabric for the coat and long pants; short sleeve top, pants and coat; or short-sleeve pajamas with short pants. Fabric widths are much narrower. Today you can usually buy fabric in 44/45" or 56/60" widths. This pattern lists fabric in 35-54 inch widths. Since I need to grade up the pattern to my size and make other modifications and I plan to make the top and bottoms in different fabric, I will wait until I get the pattern modified before I purchase my fabric. Or I can try to convert the yardage.
I'm considering using some Amy Butler fabric from Fabric.com


Further down the pattern you are given additional body measurements, but finished garment measurements are not given. I will definitely need to take careful measurements of the pieces themselves and probably make a muslin, or mock-up, of the pattern before cutting out my final fashion fabric. Notions include 2 - 50yd spools of thread, seam binding, buttons (It doesn't say what size or how many.) and two pair of frogs for the coat.

Upon inspection of the instruction sheet (only front and back of one sheet), I see that these pattern pieces are not printed on. Instead they have a series of holes punched into them to mark darts, lengthwise grain, place on fold, etc. Correctly interpreting these marks is part of the fun of using a vintage pattern. I have plenty of experience using contemporary patterns, so that should help in knowing how to lay out, cut and put things together. I love this note on the pattern instructions:
When you follow in this order and consult your dressmaking steps as you go along, you will complete your garment with ease, to fit right, to look right and to be admired by all.

Isn't that what we all want? Great fitting clothes to be "admired by all." Contemporary patterns just don't use that kind of language. Why not?

Finally, a quick look over the directions and I see that the pants have a "slide fastener", aka zipper. Hmm...that wasn't on the notions list.  I wonder what other surprises await me. Stay tuned.