Tuesday, July 20, 2010

Advance 5985 - Finale

(For those of you just tuning in, the previous posts concerning these pj's are here (preview), here (fitting) and here (construction).)

This lovely vintage pattern became...

     
...these lovely vintage-inspired pajamas.


I am very pleased with these pajamas. I have been wanting some "real" pajamas for quite some time.  My usual pajamas are t-shirts, tanks, and yoga pants. That type of knit sleepwear is extremely comfortable, but I'm always a bit self-conscious about walking around the house in them, especially when traveling, or answering the door on those mornings when I've overslept. They just show too many lumps and bumps and saggy bits, in my opinion. These are nearly as comfortable as my knitwear and just right for summer.  The woven cotton stays cool. My children think I am wearing a Hawaiian shirt to bed and that they look more like day clothes than pajamas. (And perhaps so will the unexpected early-morning door knocker.) The husband only asked that I not move toward getting twin beds.


I would like to make this pattern again out of silk for the winter with a beautiful brocade or quilted "coolie coat" to wear around the house. But that project will not happen any time soon. It's too hot to even think about quilted anything and I've got nine pieces of a summer wardrobe to finish by the end of August.

In conclusion, I love the look of vintage patterns and the challenge they provide. I do miss the more thorough instructions and definitely the multi-sized and printed patterns that we have today. Though I used mostly the construction steps as written in the vintage pattern, I think I will try to do more modern techniques when applicable. I've learned that the old way is not always the best way. I know that many sewists have their favorite methods for putting in zippers or handling facings and always use those methods versus what the pattern instructions say. I need to start making note of the best ways for me to do those things and build my own library of techniques.

Up next, a knock-off of this lovely Boden skirt:

Thursday, July 15, 2010

Advance 5985 - Construction Details

When I found time to work on this project, it went together very easily.   Several times in the construction the instructions say to cut out a facing piece or bias strips of a certain length. In modern patterns, these pieces would be included so you wouldn't have to be scrounging around through the scraps for a large enough piece. This is why reading through the instructions before you cut and sew is important!

So the side zip was something I hadn't done before, that I can remember. You first make the facing piece by making a narrow hem on a piece of fabric (I'm too lazy to look up the actual dimensions). This facing is then stitched to the trousers right sides together in a narrow V. The V is then slit and the facing is turned to the inside. The finished edges are stitched close to the teeth of the "slide fastener." The rest of the facing is tacked into place. It is not a pretty finish, but I don't think anyone will ever see this but me.
 
The waist area of the trousers ended up being too large. I was over-generous with my additions and cut off part of  the center back that and added a second pleat to the back to take up the excess. With the waistband, however, I had the opposite problem. It was too small. I cut it to fit my exact waist measurement and did not allow for any wearing ease. Ugh! I cut it out again adding 2 more inches. The instructions say to make the waistband (folding in half, right sides together, trim and turn) and then attach it to the trousers. I, instead, used a more modern method (pressing unnotched edge 1/2", stitching notched edges to trousers, then folding in half length-wise, stitching ends together, turning and stitching in the ditch to catch the folded edge in the stitching). I'm not sure if my method was any easier than the original. Probably not, but it is the method I am more used to. Though I'm not used to such high waisted pants, The waist fits comfortably. There is a bit of a gape in the back. I used a vintage button from my stash to finish them off.

For the bodice, I followed the instructions as best as I could. I did overcast the exposed shoulder, center front and back and side seams to prevent raveling. My side vent "facings" did not line up nearly as well as they should have, but with some handstitching they are acceptable. The whole time, however, I was thinking that their had to be a better way. I also tacked the sleeve facings in place to keep them folded over. The instructions do not say what size of button to use. I bought some half inch shank style buttons. They are a bit small. I can always replace them with 5/8" or 3/4" if I find that they do not stay fastened well.

Next up, the big reveal and final thoughts....

Thursday, July 8, 2010

Advance 5985 - Alteration Frustration

The vintage pajamas that I have been working on for months (or more appropriately, NOT working on) are finished! Besides not scheduling time to actually work on the sewing, what took so long? Two words: alteration frustration.

The reason I do not consider myself an advanced sewist is in part because of my limited fitting abilities. Granted, I am getting much better about using the appropriate pattern size to begin with and altering to my specific measurements, but I don't often know right off the bat what or how to do them. I have two reference books that I use in addition to online tutorials and the wealth of knowledge at Pattern Review: Singer's The Perfect Fit and Reader's Digest Complete Guide to Sewing. 

I am generally a visual person, so I have to see things in my head and visualize the flat pieces bending and morphing into their 3D shapes in order to understand. 1950's patterns to do not have the best directions.

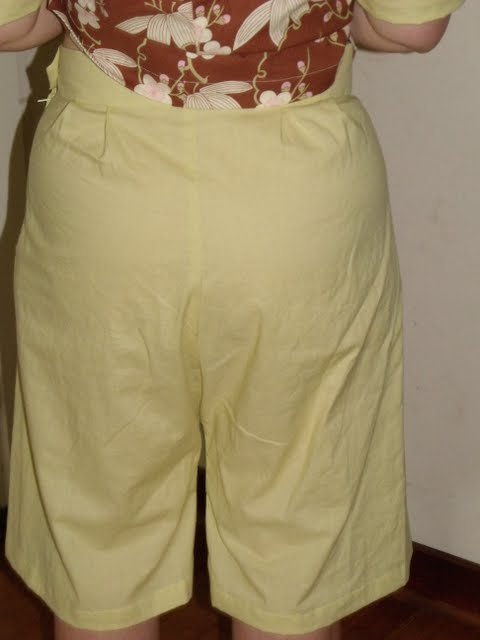
I did a flat measurement of the pattern pieces to get an idea of the finished garment measurements. Modern patterns usually include these, but not always vintage. The trousers, as I thought, were significantly smaller than my measurements. I needed to add 4 inches to the waist, 5 1/2 inches to the hip, 2 inches to the thigh and shorten them by 3 inches. These additions were complicated by the fact that the trousers pattern was once piece (no side seams!) and had the weirdest crotch profile I have ever seen.

The pattern looks almost like it is upside-down, but it is not. (Maybe they would have fit better that way?) As designed, the crotch would hang down to my knees! Did they design them this way for modesty or did they just not know how to design trousers for women?

Given the one piece pattern, I could not simply add extra to the hip side seams as my fitting books were showing me.  So after studying the instructions and pictures, munching on some peanuts making sketches with my fitting book perched atop my head (osmosis?) I finally figured it out. To preserve the crotch length (even though it was weird, it was long enough), I split the pattern down the middle and added 2 inches (for a total of 4" at waist) and added an additional 3/8" width at the crotch seam for the 1 1/2 inches needed at the hips. I added 1" at the inner thigh and left the length for the time being.
The tissue fit of these changes was fine in the hip area, but, as I suspected, the crotch was 3-4 inches too low. After bringing up the depth, I followed the Reader's Digest guide for adding length by utilizing both the crotch point and crotch seam methods. Now my funky crotch line looks more like this.


 To alter the waistband (aka "belt") I added 1 1/8" to the side seam between the front and back notch and 1 3/4 inches between the back notches for 2 7/8 inches total. This proved to be wrong on my part, but more about that later.

I knew that the bodice would not be too difficult to alter. The flat measurement revealed that the top had a generous amount of ease (9 inches at the bust line and about 7 inches in the hip area). As I said in my previous post, a 34 bust is just about right for me. After all of that drama with the trousers, I was delighted to find that I did not need to make a single alteration to the bodice. Not. One. Even the neck and arms fit beautifully with plenty of ease built in!

I felt confident enough with the fit of both pieces to cut out my fashion fabric. I had originally wanted to use a coppery brown to match the background of the Amy Butler fabric, but once it arrived it did not match nearly as well as I thought it did online. (That's one of the dangers of online fabric shopping). At my local fabric store I came across this lightweight cotton in a lovely chartreuse. It is not a color that I would have ever chose, but I really like it! It has a very vintage look to it. I also used the chartreuse for the accent pieces of the top. Some lovely yellow buttons, a lovely yellow thread and zipper and I was on my way!

Next up the construction...
My previous post on this pattern: Walk Through a Vintage Pattern .

Tuesday, July 6, 2010

Change is good

I have not given up on writing this blog. I find that I write more for quality than for quantity and given my limited time for writing, the posts I've been working on and wanting to work on are taking longer to write than I first thought. I am also making changes to the blog. Though all of the things I have been writing about are interesting to me, I realize that my readership may not be so diverse. So I am actually going to divide my writing up into three separate blogs. Measure for Measure will now be focused solely on sewing and fashion.  My food posts are going to move over to The Rainy Day Baker. And when I come up with a good name for my third blog my more poignant posts about my family, homeschooling, philosophy and stuff, will be there.  (Come on over to The Well-fed Mind!) Thanks for all who have been reading and commenting. It really encourages me to read your thoughts!

Finally, behind the scenes, so to speak, I have implemented a better schedule for sewing and writing in my daily life. Having time on the schedule for these activities is really helping me stay focused and getting things accomplished without feeling guilty that I am not with the children or husband 24/7. So, hopefully, I will be posting more frequently and sharing more projects with you. Stay tuned!